The Ultimate in 100% Leather BDSM and Bondage Gear
|
|
|
|
|
|
|
|
The Ultimate in 100% Leather BDSM and Bondage Gear
|
|
To Have Your site Reviewed
Our Parent Site
|
At BDSM GEAR we take care of our customers. leather floggers bdsm gear dungeon furniture whips cuffs ondage store adult sex store bdsm gear bondage
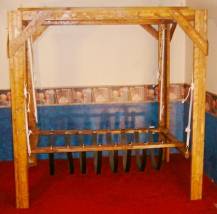
Assembling Your New Suspension Stand 1) look over instructions and identify parts as this will make assembly easier. 2) Assemble top of stand using 4 doubled top rails, Note that the top of these are marked TOP. It is important that they are assembled with all of the TOPS up. Fasten with 8 3” lag bolts and washers in countersunk holes. DO NOT OVER TIGHTEN.
4) Install center beam to top using 2 longest lag bolts and washers.
Top is complete Go to next page Leg Assembly 5)
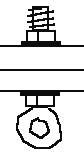
Install 1 hook in each leg, in predrilled hole.
6)
Install tie down hooks to legs in predrilled holes
using short, heavy screws
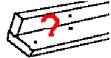
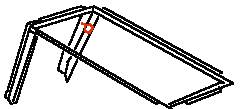
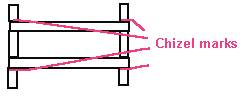
8) Install 2 thin wood corner braces on each leg using one 3” and one 5” carriage bolt, washers, and wingnuts in each brace 11) Assemble cradle by placing long boards over short boards, aligning them with chisel marks and installing long screws.
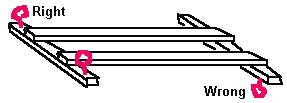
12) Install 4 eyebolts in cradle at ends of short boards EXTREMELY IMPORTANTWith the long boards on TOP of the short boards the eyebolts MUST point up as shown below. Otherwise the cradle WILL FAIL and can result in injury.
13) Install 3” lag bolts in long boards allowing them to stick out well so straps can attach to them.
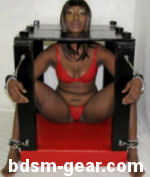
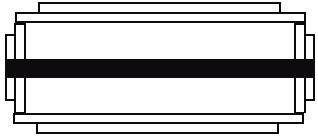
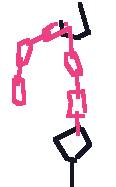
Your stand has 4 single and 4 double pulleys, rope, safety chains, and instructions. Please see the instructions below for safe use and rigging of the cradle, slings, and other items Rigging and safe suspension These instructions are provided to help make suspension a little bit safer however suspension is never actually safe and even with all precautions taken it can still result in injury or death. By providing these instructions Micronack Technologies is NOT recommending that you attempt to suspend anyone, and Micronack Technologies is NOT assuming any responsibility. Safety
is your responsibility. A Few Precautions. 1 Always check your gear for cracks, fraying, excessive stress, etc. 2 Always have a knife on hand to quickly cut ropes in an emergency, If chains are used bolt cutters should also be handy. 3 Inform the sub beforehand that they should remain fairly still while suspended, as moving about can cause problems with rigging, stresses equipment, and can get them in a very uncomfortable position which may be hard to get them out of quickly. 4 When lifting a sub it is often a good idea to leave their hands, and maybe even feet free until the lift is complete and your ready to tie them off to stay a while. This not only lessens the danger as they can catch their self in the event that something goes wrong during the lift, but it also makes the sub a lot more comfortable with what is being done to them. 5 Always use safety chains with ropes or two sets of ropes. Suspension is one place where backup is a necessity. Rope and chains should be rigged as follows for use with the cradle, a sling, etc. First Slide the end of a chain over each of the eyebolts on the cradle
Now
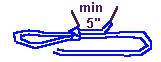
to start the rope, start with a good eyeknot wrap around eyebolt and follow the path shown
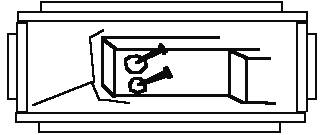
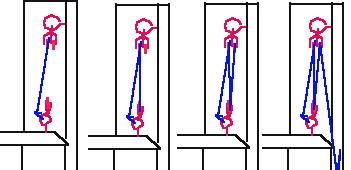
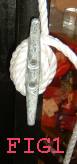
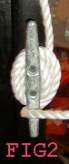
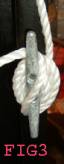
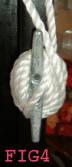
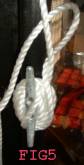
Using the tied downs The ties we use provide a very fast easy and safe manner to tie off a rope when done properly This is accomplished by wrapping the rope around about 3 times {FIG1}, then go around one of the points {FIG2 and 3} this will reverse the direction of rotation. Now wrap the rope a few times going the other way {FIG4} Finish off by going between the taught rope and the tiedown {FIG5} and then pull the rope down tight so that it is pinched between the tiedown and the taught rope {FIG6}
Now slide the tops of the chains over the hooks on the stands legs. Using safety chains The key to safety chains is they should be easy to adjust so that they get used properly. This is accomplished by always using the top for adjustment. Always keep safety chains adjusted so that they are not tight but they will not allow the ropes to slip more then a couple inches.
|
18 U.S.C. 2257 STATEMENT In compliance with the Federal Labeling and Record-Keeping Law (also known as 18 U.S.C. 2257), all models located within our domain were 18 years of age or older during the time of photography. All content and images are in full compliance with the requirements of 18 U.S.C. 2257 and associated regulations. Please keep
an eye on your children when they are on the internet.
Send mail to
BDSM
Gear with
questions or comments about this web site.
|